So, that this point you have seen various ways in which LINQ to XML can be used to create, save, parse, and load XML data. The next aspect of LINQ to XML you need to examine is how to navigate a given document to locate and change specific items in the tree using LINQ queries and the LINQ to XML axis methods.
To do so, you will build a Windows Forms application which will display the data within a XML document saved on the hard drive. The GUI will allow the user to enter data for a new node, which will be added to the same XML document. Finally, you will provide a few ways for the user to perform searches on the document, via a handful of LINQ queries.
Note Given that you have already built a number of LINQ queries in Chapter 13, I won’t bother to relist numerous queries. If you are interested in seeing some additional LINQ to XML specific examples, look up the topic “Querying XML Trees” in the .NET Framework 4.0 SDK documentation
Create a Windows Forms application named LinqToXmlWinApp and change the name of your initial Form1.cs file to MainForm.cs (using the Solution Explorer). The GUI of this window is quite simple. On the left of the window, you have a TextBox control (named txtInventory), which has the Multiline property set to true, and the ScrollBars property set to Both.
Beyond that, you have one group of simple TextBox controls (txtMake, txtColor and txtPetName) and a Button btnAddNewItem, which will allow the user to add a new entry to the XML document. Finally, you have another group of controls (a TextBox named txtMakeToLookUp and a final Button named btnLookUpColors) which allows the user to query the XML document for a set of specified nodes. Figure 24-4 shows one possible layout.
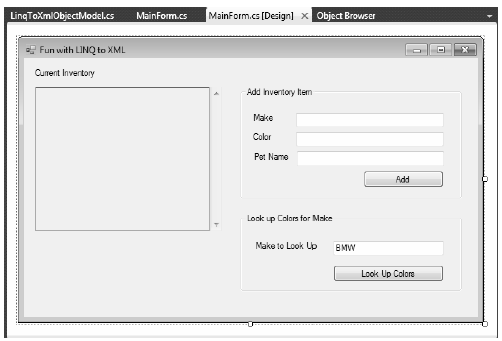
Figure 24-4 The GUI of the LINQ to XML application
Handle the Click event for each button to generate the event handler methods. Also handle the Load event of the Form itself. You will implement these handlers in a bit.
The downloadable code for this book contains a file named Inventory.xml within the solution code for this example. It supports a set of entries within the root <Inventory> element. Import this file into your project by selecting the Project > Add Existing Item menu option. As you look at the data, you will see the root element defines a set of <Car> elements, each of which is defined similar to the following:
<Car carID ="0">
    <Make>Ford</Make>
    <Color>Blue</Color>
    <PetName>Chuck</PetName>
</Car>
Before you continue on, be sure you select this file in the Solution Explorer, and then, using the Properties window, set the Copy to Output Directory property to Copy Always. This will ensure the data is deployed to your \bin\Debug folder when you compile the application.
To isolate the LINQ to XML data, insert a new class to your project named LinqToXmlObjectModel. This class will define a set of static methods which encapsulate some LINQ to XML logic. First of all, define a method which returns a populated XDocument based on the contents of the Inventory.xml file (be sure to import the System.Xml.Linq and System.Windows.Forms namespaces into this new file):
public static XDocument GetXmlInventory()
{
    try
    {
        XDocument inventoryDoc = XDocument.Load("Inventory.xml");
        return inventoryDoc;
    }
    catch (System.IO.FileNotFoundException ex)
    {
        MessageBox.Show(ex.Message);
        return null;
    }
}
The InsertNewElement() method (shown in the following) receives the values of the “Add Inventory Item” TextBox controls to place a new node into the <Inventory> element using the Descendants() axis method. After this is done, you will save the document.
public static void InsertNewElement(string make, string color, string petName)
{
    // Load current document.
    XDocument inventoryDoc = XDocument.Load("Inventory.xml");

    // Generate a random number for the ID.
    Random r = new Random();

    // Make new XElement based on incoming parameters.
    XElement newElement = new XElement("Car", new XAttribute("ID", r.Next(50000)),
        new XElement("Color", color),
        new XElement("Make", make),
        new XElement("PetName", petName));

    // Add to in-memory object.
    inventoryDoc.Descendants("Inventory").First().Add(newElement);

    // Save changes to disk.
    inventoryDoc.Save("Inventory.xml");
}
The final method, LookUpColorsForMake() will receive the data in the final TextBox to build a string that contains the colors of a specified make, using a LINQ query. Consider the following implementation:
public static void LookUpColorsForMake(string make)
{
    // Load current document.
    XDocument inventoryDoc = XDocument.Load("Inventory.xml");

    // Find the colors for a given make.
    var makeInfo = from car in inventoryDoc.Descendants("Car")
        where (string)car.Element("Make") == make
        select car.Element("Color").Value;

    // Build a string representing each color.
    string data = string.Empty;
    foreach (var item in makeInfo.Distinct())
    {
        data += string.Format("- {0}\n", item);
    }

    // Show colors.
    MessageBox.Show(data, string.Format("{0} colors:", make));
}
All you need to do at this point is fill in the details of your event handlers. Doing so is as simple as making calls to your static helper methods:
public partial class MainForm : Form
{
    public MainForm()
    {
        InitializeComponent();
    }

    private void MainForm_Load(object sender, EventArgs e)
    {
        // Display current XML inventory document in TextBox control.
        txtInventory.Text = LinqToXmlObjectModel.GetXmlInventory().ToString();
    }

    private void btnAddNewItem_Click(object sender, EventArgs e)
    {
        // Add new item to doc.
        LinqToXmlObjectModel.InsertNewElement(txtMake.Text, txtColor.Text, txtPetName.Text);

        // Display current XML inventory document in TextBox control.
        txtInventory.Text = LinqToXmlObjectModel.GetXmlInventory().ToString();
    }

    private void btnLookUpColors_Click(object sender, EventArgs e)
    {
        LinqToXmlObjectModel.LookUpColorsForMake(txtMakeToLookUp.Text);
    }
}
Figure 24-5 shows the end result.
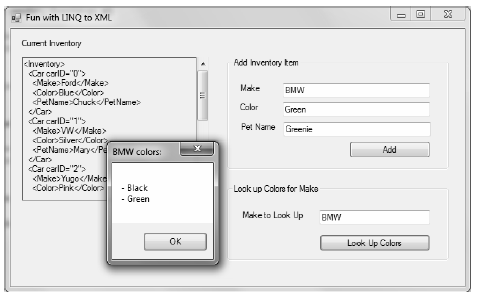
Figure 24-5 The completed LINQ to XML application
That wraps up the introductory look at LINQ to XML and your investigation of LINQ. You first encountered LINQ in Chapter 13, where you learned about LINQ to Objects. Chapter 19 showed various examples using PLINQ, while Chapter 23 showcased how you can apply LINQ queries to ADO.NET Entity objects. Using all of this information, you are in good shape to dig deeper, which you should. Microsoft has made it very clear that LINQ will continue to evolve as the .NET platform grows.
Source Code The LinqToXmlWinApp to XML example can be found under the Chapter 24 subdirectory.